Mounting the Installation Brackets
Level mounting is critical to the operation of the blind. Use a carpenter's level to check that the mounting surface is level on an inside mount. Shim the brackets, if necessary. On an outside mount, the tops of the installation brackets must be level and aligned at the same height.Brackets Spacing
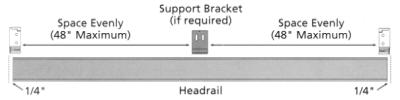
| Bracket spacing is the same for both inside-mounted and outside-mounted applications. The two hinged-cover brackets should be positioned 1/4" beyond the ends of the headrail. Blinds over 48" wide must have a support bracket spaced evenly between the end brackets. Blinds over 72" wide must have two support brackets spaced no more than 48" apart. Blinds over 96" wide or 114" long require an additional support bracket positioned 7" in from the cordlock end of the headrail. All bracket locations should be measured, marked, and the mounting holes drilled. |
|
Inside Mount Applications
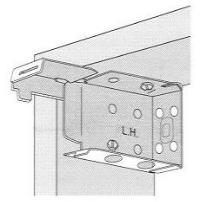
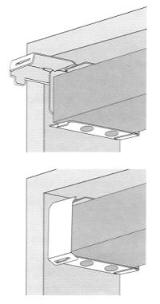
| Installation brackets for inside mounts are attached inside the window frame, or to the ceiling. Shim the mounting surface if necessary to ensure that the headrail is mounted level. The front edges of the brackets must be aligned. Support brackets, if required, should be positioned so that they are aligned with the end brackets. Two screws are used to attach each bracket. Whenever possible with end brackets, one screw should be located on the side and one located at the top, as shown in the illustration on the right. The hinged-cover installation brackets open by pressing the bottom side up, and pulling the locking safety cover open. |
|
|
||||||||||||||
Outside Mount Applications
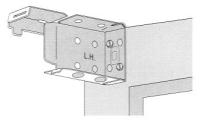
| Installation brackets for outside mounts are attached to the window frame or wall, or to a door. A flat vertical surface at least 1-3/4" high is required for attachment. The installation brackets must be level and aligned at the same height to ensure level mounting of the headrail. Support brackets, if required, should be positioned so that they are aligned at the same height as the end brackets. Two screws are used to attach each bracket. Locate the screws diagonally, as pictured on the right. |
|
End Mount Applications
Blinds can span open areas, such as arched window openings, by either inside or outside mounting the end brackets. Because support brackets cannot be used, the blinds can be no wider than 48".Optional Extension Brackets
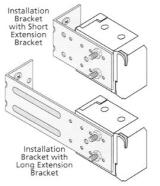
| Extension brackets can be used with outside mounts to project the installation brackets from the mounting surface. Their purpose is to allow the blind to clear obstructions, such as window cranks. Extension brackets are secured to the mounting surface with two diagonally located screws. The installation brackets are then attached to the extension brackets. There are two sizes of extension brackets: short and long. Short extension brackets can project the installation brackets up to 1-7/8" from the mounting surface. Long extension brackets can project the installation brackets up to 3-7/8". To prevent flexing, extension brackets should be mounted so that the sides of the installation brackets can be attached, as show in the illustrations to the right. Position the extension brackets so that all installation and support brackets, 1) will be aligned and positioned at the same height; and 2) will project the same distance from the mounting surface. Connect the mounting brackets to the extension brackets using two screws, diagonally positioned whenever possible. |
|
Installing the Blind
|
If no support brackets are used, simply slip the headrail into the end brackets and snap the locking covers shut. The headrail is held securely in place by the locking, safety-hinged cover of the end installation brackets. If the blind is loose in the end brackets, open the hinged cover and expand the tabs on the headrail end locks using a screwdriver. If the blind is too tight, compress one of both of the tabs. |
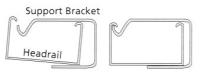 If support bracket(s) are used, tip the headrail into the support bracket(s) while placing rail into the end brackets, as shown in the illustration below. |
Wand Attachment (Wand Tilt Control Only)
The tilt mechanism inside the headrail has a metal shaft protruding from it that extends beneath the rail. The wand must be connected to this shaft.The plastic sleeve pulls apart from the top of the wand to expose a metal hook. The hook fits through the hole in the metal shaft.
Slide the plastic sleeve over the metal shaft and insert the wand hook through the hold. Then slide the plastic sleeve back down over the hook until it is firmly seated.
Open and close the slats to test the wand tilter. Six revolutions of the wand should tilt the slats from fully open to fully closed.
Valance Attachment
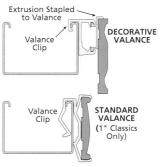
| The valance is attached to the headrail using valance clips. Install one clip on each end, and space any others evenly in-between, no more than 48" apart. If the valance is outside mounted, attach the valance returns using the corner keys provided. Slots in the valance and returns help you to easily position the corner keys. Important: Install the valance clips and attach the returns before mounting the headrail. After mounting the headrail, attach the valance. Snap the extrusion stapled to the valance into the clips (decorative valance) or snap the valance directly into the clips (standard valance). |
|
Cornice Attachment
Cornices can be attached to the headrail with cornice clips, or they can be attached directly to the mounting surface. Complete installation instructions are included with each cornice.Specialty Shapes
Movable specialties are installed using either box brackets (straight headrail) or holes drilled into the headrail (angled or curved headrail). Support brackets and extension brackets can be used with straight headrails only.Fixed slats specialties are installed using aluminum mini blind hold-down brackets and pins.