Hunter Douglas EverWood Installation Instructions
|
|
|
| CHECK HARDWARE |
Blinds up to 48" in width come with . . .
- 1 Left End Bracket
- 1 Right End Bracket
- 4 Mounting Screws
(See Illustration A)
Blinds from 48" to 60" in width come with . . .
- 1 Left End Bracket
- 1 Right End Bracket
- 1 Intermediate Support Bracket
- 6 Mounting Screws
(See Illustration B)
Blinds from 60" to 96" in width come with . . .
- 1 Left End Bracket
- 1 Right End Bracket
- 2 Intermediate Support Brackets
- 6 Mounting Screws
(See Illustration C)
Standard hardware that comes with all orders . . .
- Valance Clip
- Wand
- Valance
- 2 Valance Returns
- 4 Valance Corner Keys
Optional hardware that you may or may not have depending on what you ordered . . .
- Sill Hold Down Bracket
- Jamb Hold Down Bracket
- Hold Down Bracket Pin
- 4" Extension Bracket
- 2" Extension Bracket
Tools you'll need for the installation . . .
- Drill
- Measuring Tape
- Pencil
- Screwdriver
- Level
|
Illustration A: Hardware Set 1
 |
Illustration B: Hardware Set 2
 |
Illustration C: Hardware Set 3
 |
Illustration D: Standard Hardware
 |
Illustration E: Optional Hardware
 |
Illustration F: Needed Tools
 |
|
Back to Contents
|
|
| DETERMINE MOUNTING TYPE |
Did you want this mounted as an inside or outside mount.
See the picture to the right for an illustration of the difference
between an inside and an outside mount. Note: If you
ordered this as an inside mount it will need to be mounted
as an inside mount. If you ordered it as an outside mount
then you will need to order this as an outside mount.
|
Illustration G: Inside/Outside Mount
 |
|
Back to Contents
|
|
| INSIDE BRACKET MOUNTING |
There are three basic types of inside mounts. . .
- Inside Bracket Side Mount:
This is where the blind is mounted inside of the window
casement and afixed to the outer sides of the window
casement.
(See Illustration H1)
- Inside Bracket Top Mount:
This is where the blind is mounted inside of the window
casement and afixed to the top of the window casement.
(See Illustration H2)
- Inside Bracket Wall Mount:
This is where the blind is mounted inside of the window
casement and afixed to the back against a wall. In this
you will want to use wall anchors. Mark two diagonal drill
holes through the screw holes in the bracket while holding
it up in place where it will be afixed. Drill the holes for
the anchors and tap them into place.
(See Ilustration H3)
|
Illustration H1: Side Mount
 |
Illustration H2: Top Mount
 |
Illustration H3: Wall Mount
 |
|
Back to Contents
|
|
| OUTSIDE BRACKET MOUNTING |
If you will be mounting your blind as an outside mount
follow the steps below.
- Hold the headrail up to the window about where you will
want it hung (centering it across the window).
- Lower the slats all of the way down.
- Mark where the ends of the headrail are on either side on
the wall. Also mark where the top of the headrail is on the
wall. When marking the top edge of the headrail do so in
two locations. That way the headrail can be brought back
to the same position.
(See Illustration I1)
- If the bottomrail will come to rest on the sill adjust the
position of the blind so that when it is fully lowered the
bottomrail just comes to rest on the sill.
(Skip: Leveling Part 5)
- If the bottomrail will not be resting on the sill but rather
hanging below the sill use the level to adjust the two
top headrail lines so that they are leveled to the room.
(See Illustration I2)
- Mark the outside edge of the brackets 1/4" inch to the
outside of the headrail ends.
(See Illustration I3)
|
Illustration I1: Marking Headrail Position
 |
Illustration I2: Marking Level Position
 |
Illustration I3: Marking Bracket Position
 |
|
Back to Contents
|
|
| MOUNTING THE BRACKETS |
Place the bracket into position. Using either the marks you made
for the brackets (outside mount) or using the blinds position for
an inside mount as a guide. Place the screws on the diagonal as
shown.
(See Illustration J)
|
Illustration J: Mounting the Brackets
 |
|
Back to Contents
|
|
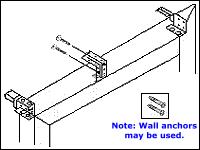
| MOUNTING THE INTERMEDIATE SUPPORT BRACKETS |
Intermediate brackets should be spaced evenly across the
headrail. And, should be mounted in positions that do not
interfere with internal parts. For best results, install screws
on a diagonal as shown. Be sure to align the tops of the bracket
to your marked level line. As the tops of all the brackets (end
brackets and support brackets) must be kept level and even with
each other. Wall anchors may be used when mounting into non-
wood surfaces.
(See Illustrations K and L)
|
Illustration K: Mounting the Support Brackets
 |
Illustration L: Level Bracket Positions
 |
|
Back to Contents
|
|
|
|
| OPENING THE BRACKETS |
To open the bracket door and release the headrail press on the
catch tab to release and lift up on the bottom edge of the door.
(See Illustration N)
|
Illustration N: Opening the Brackets
 |
|
Back to Contents
|
|
| INSTALLING THE BLIND INTO THE BRACKETS |
To insert the blind into the brackets the headrail, needs to be
slightly rotated so that the back lip of the headrail will slide
under the front lip of the installation bracket.
Once inserted, check to see that the front lip of the intermediate
support bracket(s) is under the front lip of the headrail.
(See Illustration O)
|
Illustration O: Installing the Blind
 |
|
Back to Contents
|
|
| ADJUSTING THE FIT |
At either end of the headrail is a tab. By sticking the tip of a flat
head screwdriver behind the tab and turning the screwdriver to
bend out the tab a little bit you can adjust the fit of the blind
inside the mounting brackets.
(See Illustration P)
|
Illustration P: Adjusting the Fit
 |
|
Back to Contents
|
|
| CLOSING THE BRACKETS |
Now that the headrail has been fully inserted into the brackets,
the end brackets can now be closed by pushing the cover down
until it snaps over the locking tab on the bottom of the bracket.
(See Illustration Q)
|
Illustration Q: Closing the Brackets
 |
|
Back to Contents
|
|
| INSERTING THE VALANCE CORNER KEYS |
Along the back side of the valance and the valance returns are
two horizontal grooves. The corner keys slide into each of these
grooves on both sides of the valance and into the grooves on the
valance returns holding the entire valance assembly together.
(See Illustration R)
|
Illustration R: Inserting the Corner Keys
|
|
Back to Contents
|
|
| INSTALLATION OF THE VALANCE ONTO THE CLIPS |
Looking at the back of the valance you will see a white piece of
plastic extrusion afixed into the top horizontal groove. The
horizontal tabs of this extrusion snap into the valance clips. The "C"
clamp-like part of the clip grips the outside (the top and bottom)
of the extrusion's tabs.
(See Illustration S)
|
Illustration S: Installation of the Valance
 |
|
Back to Contents
|
|
| INSTALLATION OF THE OPTIONAL EXTENSION BRACKETS |
Extension brackets are used only on outside mount blinds and
are secured and positioned in the same manner as the standard
brackets.
2" Extension Brackets:
- Afix the L-shaped extension bracket to the brackets
using two screws and nuts.
- Place the screws as always along the diagonal.
- The nuts go to the inside of the brackets.
4" Extension Brackets:
- Afix the L-shaped extension bracket to the end
brackets using two screws and nuts.
- Place the screws as always along the diagonal.
- The nuts go to the inside of the brackets.
(See Illustrations T1, T2, T3)
|
Illustration T1: 2" Extension Brackets
 |
Illustration T2: 2" Extension Brackets
 |
Illustration T3: 4" Extension Brackets
 |
|
Back to Contents
|
|
| INSTALLATION OF THE OPTIONAL HOLD-DOWN BRACKETS |
- Insert the two hold-down bracket pins into the pre-drilled
holes at either end of the bottomrail. You may need to tap
these in with a light hammer as it is a tight fit.
- Lower the slats down to the point where you want to attach
the hold down brackets.
- Place the brackets over the pins and mark the holes where
you will be screwing the brackets down.
- Remove the brackets from the pins and raise the blind out
of the way.
- Afix the hold-down brackets with screws where you marked
the holes.
- Lower the blind and snap the pins into the hold-down brackets.
(See Illustrations U1, U2, U3)
|
Illustration U1: Jamb Mount Hold-Down Brackets
 |
Illustration U2: Sill Mount Hold-Down Brackets
 |
Illustration U3: Door Mount Hold-Down Brackets
 |
|
Back to Contents
|
|
| INSTALLATION OF THE TILTER WAND |
- Locate the tilt wand and the tilt control sleeve.
Note: the tilt control sleeve is a small cylindrical
piece of plastic usually clear.
- Slide the tilt control sleeve over the tilt
mechanism protruding from the headrail until as
far as it will go.
- Hook the tilt wand onto the tilt mechanism.
- Slide the tilt control sleeve back down until it
secures the tilt wand onto the tilt mechanism.
(See Illustration V)
|
Illustration V: Installation of the Tilt Wand
 |
|
Back to Contents
|
|
| USE OF THE CORD TILTER |
The set of cords with the individual tassels are for the cord tilter.
Each cord tilts the blind in alternate directions.
(See Illustration W)
|
Illustration W: Use of the Cord Tilter
 |
|
Back to Contents
|
|
| RAISING AND LOWERING THE BLINDS |
To raise or lower the blind pull down and toward the center.
(See Illustration X)
To lock the blind in place hold it to the outside.
(See Illustration Y)
|
Illustration X: Raising and Lowering the Blind
 |
Illustration Y: Locking the Blind
 |
|
Back to Contents
|
|
| BREAK-THRU SAFETY TASSEL |
All of the Hunter Douglas Everwood Blinds come with the unique
Break-Thru Safety Tassel. This prevents children and pets from
getting caught in the lines and choking themselves.
(See Illustration Z)
If you need to reassemble the tassel it is easily done.
- Gather the two plastic halves of the tassel.
- Hook the knots from each cord into the halves of the tassel.
- Then just snap the halves back together.
|
Illustration Z: Break-thru Safety Tassel
 |
|
Back to Contents
|
|
| CLEANING YOUR BLIND |
Use ordinary soft, clean dust cloth, chemically treated dust cloth, vacuum cleaner brush attachmen, or other available ordinary house cleaning aids.
To Vacuum: Use the brush dust head attachment and tilt slats first up, then down (but not entirely closed) to reach the entire top and bottom surfaces.
To Dust: Use a soft cloth or chemically treated dust cloth and tilt the slats as above.
To Wash Use a damp cloth or sponge and mild detergent. Use warm or cold water, not hot water. Tilt slats as above. The blind can also be taken down, and placed in a bath of mild soapy water, then rinsed clean, wiped dry or allowed to dry completely in the open air.
|
|
Back to Contents
|
|
|

